반응형
이번에는 아이템 추가하는 기능을 구현해보도록 하겠습니다.
1. 신규요소 (Control.js) 추가
각 링크에는 onClick 이벤트 요소를 선언하고 onChangeMode함수와 연결을 해 줍니다. 이때, 모드를 인자로 넘겨줍니다.
import React, { Component } from 'react';

class Control extends Component {
    render() {
        return (
            <ul>
                <li>
                    <a href="/create" onClick={function (e) {   // onChangeMode 함수 연결
                        e.preventDefault();
                        this.props.onChangeMode('create');
                    }.bind(this)}>create</a>
                </li>
                <li>
                    <a href="/update" onClick={function (e) {   // onChangeMode 함수 연결
                        e.preventDefault();
                        this.props.onChangeMode('update');
                    }.bind(this)}>update</a>
                </li>
                <li>
                    <input onClick={function (e) {      // onChangeMode 함수 연결
                        e.preventDefault();
                        this.props.onChangeMode('delete');
                    }.bind(this)} type="button" value="delete"></input>
                </li>
            </ul>
        );
    }
}

export default Control;
2. 신규요소(CreateContent.js) 추가
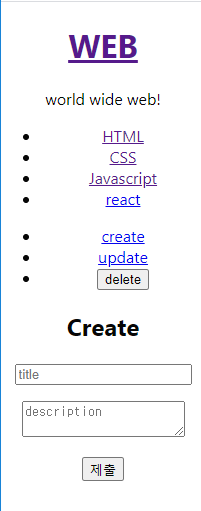
신규 생성시 입력폼을 작성합니다. 폼은 아래 그림의 아래부분과 같이 구성되어 있습니다. 이때 onSubmit 함수로 title 과 desc 값이 전달될 수 있도록 아래와 같이 코딩을 합니다.
import React, { Component } from 'react';

class CreateContent extends Component {
    render() {
        return (
            <div>
                <article>
                    <h2>Create</h2>
                    <form action="/create_process" method="post"
                        onSubmit={function (e) {
                            e.preventDefault();
                            this.props.onSubmit(
                                e.target.title.value,
                                e.target.desc.value
                            );
                        }.bind(this)}
                    >
                        <p><input type="text" name="title" placeholder="title"></input></p>
                        <p><textarea name="desc" placeholder="description"></textarea></p>
                        <p><input type="submit"></input></p>
                    </form>
                </article>
            </div>
        );
    }
}

export default CreateContent;
3. App.js 수정
- 새로 작성한 Control, CreateContent 컴포넌트를 임포트하고,
- welcome, read, create, ... 모드에 따라 content를 다르게 보여주도록 _article 변수를 활용하도록 코딩을 수정하고,
- CreateContent 컴포넌트(2번)에서 title, desc 입력 후 Submit 시 기존 content에 데이터 추가되는 부분 수정한다.
import React, { Component } from 'react';
import Subject from './components/Subject';
import TOC from './components/TOC';
import ReadContent from './components/ReadContent'; // Content -> ReadContent로 변경
import CreateContent from './components/CreateContent'; // CreateContent 추가
import Control from './components/Control';
import './App.css';

class App extends Component {
  constructor(props) {
    super(props);
    this.max_content_id = 3;  // 초기값으로 content의 값과 같이 설정함. ui와 전혀 상관이 없는 속성은 state의 외부에 선언
    this.state = {
      mode: 'create',
      selected_content_id: 2,
      welcome: { title: 'welcom', desc: 'Hello, React!!' },
      subject: { title: 'WEB', sub: 'world wide web!' },
      contents: [
        { id: 1, title: 'HTML', desc: 'HTML is HyperText ...' },
        { id: 2, title: 'CSS', desc: 'CSS is for design' },
        { id: 3, title: 'Javascript', desc: 'JavaScript is for interactive' }
      ]
    }
  }
  render() {
    var _title, _desc, _article = null;   // _article 선언. mode(welcome, read, create) 에 따라서 다른 출력
    if (this.state.mode === 'welcome') {
      _title = this.state.welcome.title;
      _desc = this.state.welcome.desc;
      _article = <ReadContent title={_title} desc={_desc}></ReadContent>  // welcome 모드에서의 표시
    } else if (this.state.mode === 'read') {
      var i = 0;
      while (i < this.state.contents.length) {
        var data = this.state.contents[i];
        if (data.id === this.state.selected_content_id) {
          _title = data.title;
          _desc = data.desc;
          break;
        }
        i = i + 1;
      }
      _article = <ReadContent title={_title} desc={_desc}></ReadContent>  // read 모드에서의 표시
    } else if (this.state.mode === 'create') {
      // 'create'모드일 경우 <CreateContent> 요소를 표시
      _article = <CreateContent onSubmit={function (_title, _desc) {      // _title, _desc를 인자로 받는다.
        this.max_content_id = this.max_content_id + 1;
        var newContents = Array.from(this.state.contents)                // 기존 content 복사하여 새 배열 생성
        newContents.push({ id: this.max_content_id, title: _title, desc: _desc })         // 기존 배열에 새로운 값 추가
        this.setState({
          contents: newContents   // 기존 contents 값을 _contents 값으로 교체 대입해준다.
        })
      }.bind(this)}></CreateContent>
    }
    return (
      <div className="App">
        <Subject
          title={this.state.subject.title}
          sub={this.state.subject.sub}
          onChangePage={function () {
            this.setState({ mode: 'welcome' });
          }.bind(this)}
        />

        <TOC
          onChangePage={function (id) {
            this.setState({
              mode: 'read',
              selected_content_id: Number(id)
            });
          }.bind(this)}
          data={this.state.contents} />

        <Control
          onChangeMode={function (_mode) {  // 모드를 인자로 받아서 전달해준다.
            this.setState({
              mode: _mode
            })
          }.bind(this)} />

        {/*<ReadContent title={_title} desc={_desc} />   삭제*/}
        {_article} {/* content를 create/read 에 따라 다르게 보여줄 새 요소 */}
      </div>
    );
  }
}


export default App;
4. TOC.js 수정
shouldComponentUpdate() 함수를 이용하여, 매 변경시마다 무조건 렌더링 되는것을 막는 코드를 추가합니다.
import React, { Component } from 'react';

class TOC extends Component {
    // 매 변경시마다 관계없는 요소들을 모두 렌더하는 것을 막아주는 기능 구현
    shouldComponentUpdate(newProps, newState) { // newProps.data는 바뀐 데이터, this.props.data는 기존 데이터
        if (newProps.data === this.props.data) {    // 바뀐 값이 있다면
            return false;                           // 렌더함수 호출 안함
        }                                           // 그 이외에는
        return true;                                // 렌더함수 호출

    }
    render() {
        var lists = [];
        var data = this.props.data;
        var i = 0;
        while (i < data.length) {
            lists.push(
                <li key={data[i].id}>
                    <a
                        href={"/content/" + data[i].id}
                        data-id={data[i].id}
                        onClick={function (e) {
                            e.preventDefault();
                            this.props.onChangePage(e.target.dataset.id);
                        }.bind(this)}
                    >{data[i].title}</a></li>);
            i = i + 1;
        }
        return (
            <div>
                <nav>
                    <ul>
                        {lists}
                    </ul>
                </nav>
            </div>
        );
    }
}

export default TOC;
- 끝 -
반응형
'Programming > Javascript' 카테고리의 다른 글
| React기초- 9.Delete (0) | 2020.07.29 |
|---|---|
| React기초- 8.Update (0) | 2020.07.29 |
| React기초- 6.이벤트 (0) | 2020.07.28 |
| React기초-5.state2 (0) | 2020.07.27 |
| React기초-4.state (0) | 2020.07.25 |


댓글