반응형
1. Controller 라우팅 추가
Controller 클래스에 "hello-mvc"라우팅을 추가합니다. 입력 파라미터로 "name"키에 값을 받아들이도록 합니다. name=???값을 이용해 "hello-template"를 반환하도록 합니다.
package hello.hellospring.controler;

import org.springframework.stereotype.Controller;
import org.springframework.ui.Model;
import org.springframework.web.bind.annotation.GetMapping;
import org.springframework.web.bind.annotation.RequestParam;

@Controller
public class HelloController {

    @GetMapping("hello")
    public String hello(Model model){
        model.addAttribute("data","hello!!");
        return "hello"; // 뷰 리졸버가 templates에서 hello로 시작하는 파일(hello.html)을 찾아서 리턴

    }
    //파라미터 추가 예
    @GetMapping("hello-mvc")
    public String helloMvc(@RequestParam("name") String name, Model model){
        model.addAttribute("name", name);
        return "hello-template";
    }
}
2. hello-template.html
아래와 같이 작성하여 받아들인 name변수의 값이 나타나도록 합니다.
<!DOCTYPE html>
<html xmlns:th="http://www.thymeleaf.org">
<head>
<meta charset="UTF-8">
<title>Title</title>
</head>
<body>
<p th:text="'hello. '+ ${name}" >hello! empty</p>
</body>
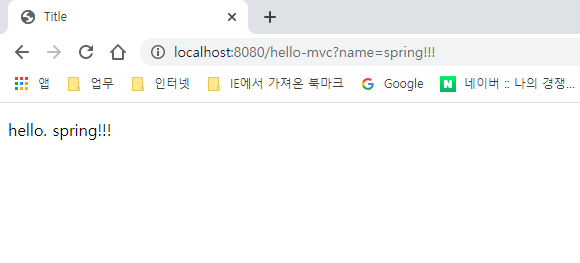
</html>3. 확인
hello-mvc 뒤에 ?name=spring!!!과 같이 입력하여 파라미터를 전달해줍니다.
~~ 끝 ~~
반응형
'Programming > Java' 카테고리의 다른 글
| Spring boot 시작하기 - 4강(테스트) (0) | 2020.11.25 |
|---|---|
| Spring boot 시작하기 - 4강(회원 도메인과 리포지토리) (0) | 2020.11.25 |
| Spring boot 시작하기 - 2강(MVC예) (0) | 2020.11.23 |
| Spring boot 시작하기 - 1강 (0) | 2020.11.23 |
| Java - Intellij Scene Builder 찾기 (0) | 2020.11.12 |


댓글