반응형
[ 목차 ]
오랫만에 간단히 PC에서 XML파일의 텍스트를 읽어올 일이 있어서, 간단히 닷넷 winform으로 만들어봤습니다. winform은 정말 오랫만이라, 또 잊어버리기 전에 기록으로 남깁니다.
해당 프로그램은 닷넷6.0, VSCode에서 만들어졌습니다.
1. 닷넷 Winform 시작
적당한 이름의 프로젝트 폴더를 만들고, 아래의 명령어어로 winform 프로젝트를 생성합니다.
dotnet new winforms // 끝에 s가 들어감을 확인
2. Form1.Designer.cs 으로 요소 추가하기
우선 필요한 버튼, 파일경로를 나타내는 textbox, 그리고 추출 결과물을 표현할 textbox를 추가합니다.
namespace wf01_xml;

partial class Form1
{
    /// <summary>
    ///  Required designer variable.
    /// </summary>
    private System.ComponentModel.IContainer components = null;

    /// <summary>
    ///  Clean up any resources being used.
    /// </summary>
    /// <param name="disposing">true if managed resources should be disposed; otherwise, false.</param>
    protected override void Dispose(bool disposing)
    {
        if (disposing && (components != null))
        {
            components.Dispose();
        }
        base.Dispose(disposing);
    }

    #region Windows Form Designer generated code

    /// <summary>
    ///  Required method for Designer support - do not modify
    ///  the contents of this method with the code editor.
    /// </summary>
    private Button button1;
    private TextBox textBox1;
    private TextBox result1;
    private Panel panel1;
    private void InitializeComponent()
    {
        this.components = new System.ComponentModel.Container();
        this.AutoScaleMode = System.Windows.Forms.AutoScaleMode.Font;
        this.ClientSize = new System.Drawing.Size(1100, 450);
        this.Text = "Form1";

        // 버튼 컨트롤 생성 및 설정
        this.button1 = new System.Windows.Forms.Button();
        this.button1.Location = new System.Drawing.Point(10, 10);
        this.button1.Name = "button1";
        this.button1.Size = new System.Drawing.Size(70, 50);
        this.button1.Text = "Click Me!";
        this.button1.UseVisualStyleBackColor = true;
        // this.button1.Click += new System.EventHandler(this.button1_Click);  // 클릭 이벤트 핸들러 등록

        // 버튼을 폼에 추가
        this.Controls.Add(this.button1);

        // 텍스트 박스 생성 및 추가
        this.textBox1 = new System.Windows.Forms.TextBox();
        this.textBox1.Location = new System.Drawing.Point(10, 70);
        this.textBox1.Name = "textBox1";
        this.textBox1.Size = new System.Drawing.Size(500, 500);
        this.textBox1.Text = "";
        // this.textBox1.UseVisualStyleBackColor = true;
        this.Controls.Add(this.textBox1);

        // 패널 생성 및 추가
        this.panel1 = new System.Windows.Forms.Panel();
        this.panel1.Anchor = ((System.Windows.Forms.AnchorStyles)(((System.Windows.Forms.AnchorStyles.Top | System.Windows.Forms.AnchorStyles.Left)
            | System.Windows.Forms.AnchorStyles.Right | System.Windows.Forms.AnchorStyles.Bottom)));
        this.panel1.Location = new System.Drawing.Point(10, 100);
        this.panel1.Name = "panel1";
        this.panel1.Size = new System.Drawing.Size(1090,330);
        // this.panel1.TabIndex = 0;
        // this.panel1.Width = this.ClientSize.Width;
        // this.panel1.Height = this.ClientSize.Width;
        // this.panel1.Dock = System.Windows.Forms.DockStyle.Fill;
        this.panel1.AutoScroll = true;
        this.panel1.BackColor = Color.DimGray;

        this.Controls.Add(this.panel1);

        // 텍스트 박스 생성 및 추가
        this.result1 = new System.Windows.Forms.TextBox();
        this.result1.Name = "resul1";
        this.result1.Multiline = true;
        this.result1.Location = new System.Drawing.Point(0, 0);
        this.result1.ScrollBars = System.Windows.Forms.ScrollBars.Vertical;
        this.result1.Dock = System.Windows.Forms.DockStyle.Fill; // Dock 속성 설정
        this.result1.Text = "";

        // 텍스트 박스의 크기와 위치를 조정
        // this.result1.Width = this.panel1.ClientRectangle.Width;
        // this.result1.Height = this.panel1.ClientRectangle.Height;
        this.panel1.Controls.Add(this.result1);


    }

    #endregion
}
3. Form1.cs
버튼을 누르면 파일탐색이 가능한 filedialog를 생성하고, 선택한 XML 파일로부터 데이터를 처리하도록 구성합니다. 특히 XML에서 각 노드의 값을 가져오는 부분은 불러오고자하는 파일의 형식에 맞게 수정하시기 바랍니다. 아직 미완성인 부분...
namespace wf01_xml;
using System;
using System.Text;
using System.Xml;

public partial class Form1 : Form
{
	public Form1()
	{
		InitializeComponent();
		this.button1.Click += new System.EventHandler(this.button1_Click);
	}

	private void button1_Click(object sender, EventArgs e)
	{
		OpenFileDialog openFileDlg = new OpenFileDialog();
		openFileDlg.Filter = "XML Files (*.xml)|*.xml";
		openFileDlg.ShowDialog();
		// MessageBox.Show("Hello World!");
		if (openFileDlg.FileName.Length > 0)
		{
			foreach (string Filename in openFileDlg.FileNames)
			{
				this.textBox1.Text = Filename;

				XmlDocument xmlDoc = new XmlDocument();  // XmlDocument 객체 생성
				xmlDoc.Load(Filename);                 // XML 파일 로드
				XmlNodeList allNodes = xmlDoc.SelectNodes("//bookstore//*");
				StringBuilder sb = new StringBuilder();

				foreach(XmlNode node in allNodes){
					if(node.NodeType == XmlNodeType.Element){
						sb.Append(node.InnerText);
					}
					else if (node.NodeType == XmlNodeType.Text){
						sb.Append(node.Value );
					}
					// sb.Append("\n");
					sb.Append(Environment.NewLine);
				}

				this.result1.Text = sb.ToString();
			}
		}
	}
}
4. 샘플XML (Book.xml)
<?xml version="1.0" encoding="UTF-8"?>
<bookstore>
  <book category="children">
    <title lang="en">Harry Potter</title>
    <author>J.K. Rowling</author>
    <year>2005</year>
    <price>29.99</price>
  </book>
  <book category="web">
    <title lang="en">Learning XML</title>
    <author>Erik T. Ray</author>
    <year>2003</year>
    <price>39.95</price>
  </book>
</bookstore>
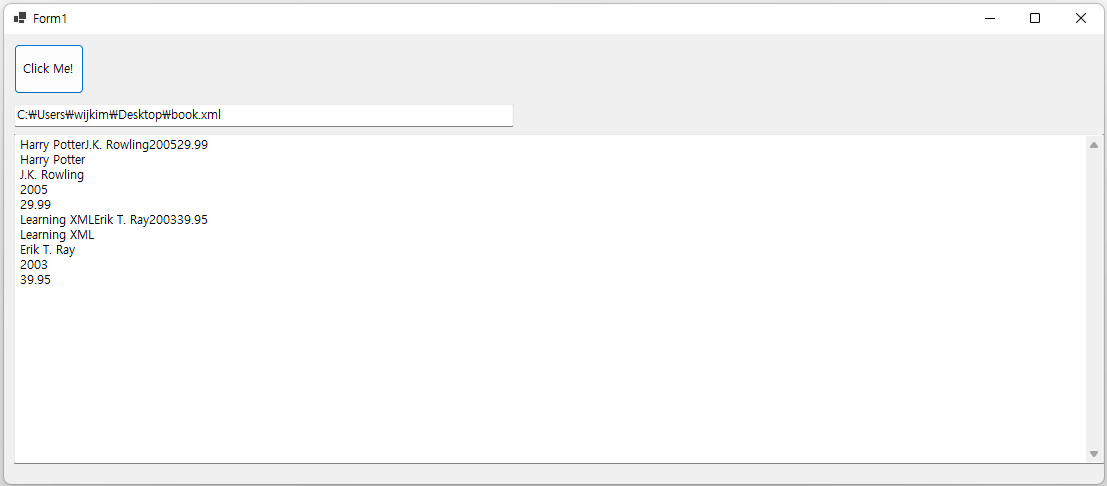
<결과>
부모 노드에서는 자식노드들의 값을 모두 출력합니다. 원하는 결과는 아니지만 조금 더 수정하면 비슷하게 사용은 가능할 것 같습니다.
반응형
'Programming > C#' 카테고리의 다른 글
| Winform material skin 적용하기 (VSCode) (0) | 2025.02.05 |
|---|---|
| C#(WPF) - Datagrid 멀티라인 추가하기 (2) | 2023.02.14 |
| .NET6(dotnet6)에서 entity framework 설치하기 (ef명령어 오류) (2) | 2022.09.14 |
| C#(WPF) - 실행 프로그램 아이콘 설정하기 (0) | 2022.04.22 |
| C#(WPF) 프린트 - 단순 출력부터 다이얼로그 없이 출력하기까지 (0) | 2022.01.14 |


