반응형
1. router/index.js 수정
불필요한 라우팅을 삭제합니다.
import { createRouter, createWebHistory } from 'vue-router';
import Home from '../views/HomeView.vue';


const routes = [
  {
    path:'/',
    name: 'Home',
    component: Home
  }
]

const router = createRouter({
  history: createWebHistory(process.env.BASE_URL),
  routes
})

export default router;
2. 불필요한 view도 삭제합니다.
views/AboutView.vue --삭제
3. App.vue 수정
<template>
  <router-view />
</template>

<script>

</script>

<style>

</style>
4. views/HomeView.vue 수정
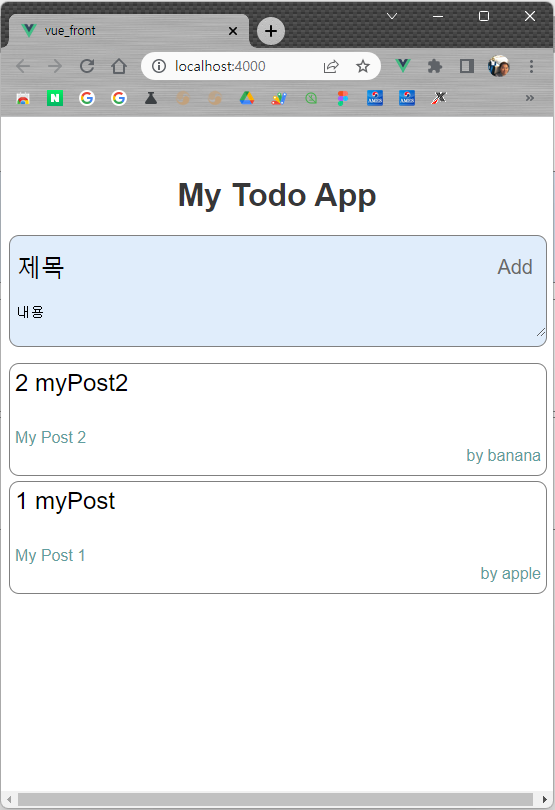
Todo 대신 Post라는 이름으로 진행합니다. 홈뷰에서는 전체 Post를 가져오는 컴포넌트와, 신규 Post를 작성하는 컴포넌트를 둘 예정입니다.
<template>
  <h1 class="appname">My Todo App</h1>
  <AddPost />
  <ListofPost />
</template>

<script>
import ListofPost from '../components/ListofPost.vue'
import AddPost from '../components/AddPost.vue'

export default {
  name: 'HomeView',
  components: {
    ListofPost,
    AddPost,
  }
}
</script>

<style>
#app {
  font-family: Avenir, Helvetica, Arial, sans-serif;
  -webkit-font-smoothing: antialiased;
  -moz-osx-font-smoothing: grayscale;
  color: #2c3e50;
  margin-top: 60px;
}
.appname {
  color:#373738;
  text-align: center;
}
.addbutton{
  margin: auto;
  display:flex;
  align-items:center;
  justify-content: center;
  width:50px;
  height:50px;
  border-radius: 50%;
  background-color:blue ;
  font-size: 36px;
  font-weight: bold;
  color:beige;
}
.logincheck{
  text-align: right;
  margin-right: 15px;
}
</style>
5. components/ListofPost.vue
data로는 개별 포스트의 id, 타이틀, 내용, 작성자 정보를 갖고 있습니다. (나중에 store에서 가져올 예정)
각각의 포스트를 돌면서 EachofPost 컴포넌트에 값을 넣어줍니다.
각각의 EachofPost에는 해당 값이 Props로 전달됩니다.
<template>
  <ul>
    <li v-for="post in posts.slice().reverse()" :key=post>
      <EachofPost
        :id=post._id
        :titleOfPost=post.title
        :bodyOfPost=post.body
        :creator=post.creator />
    </li>
  </ul>
</template>
<script>
import EachofPost from './EachofPost.vue'

export default {
  name: 'ListofPost',
  components: {
    EachofPost,
  },
  data(){
    return {
      posts: [
        {
          _id:1,
          title: 'myPost',
          body: 'My Post 1',
          creator: 'apple'
        },
        {
          _id:2,
          title: 'myPost2',
          body: 'My Post 2',
          creator: 'banana'
        }
      ]
    }
  }
}
</script>

<style>
ul{
  padding-left:0;
}
li{
  list-style: none;
}
</style>
6. components/EachofPost.vue
Props로 받아오는 속성들을 정의해줍니다. 그리고 화면에 출력합니다.
<template>
  <div class="post">
    <div class="post_header">
      <div class="title">
        {{ id }}
        {{ titleOfPost }}
      </div>
    </div>
    <div class="post_body">
      {{ bodyOfPost }}
      <div class="creator">
        by {{  creator }}
      </div>
    </div>

  </div>
</template>

<script>
export default {
  props:['id','titleOfPost', 'bodyOfPost','creator'],
}
</script>

<style>

.post{
  /* background-color:blanchedalmond; */
  margin: 5px auto;
  border: 1px solid grey;
  border-radius: 10px;
  width:100%;
  min-height:100px;
}
.post .post_header{
  display: flex;
  padding: 5px;
}
.post .post_header .title{
  display:inline-block;
  text-align: left;
  font-size: 24px;
  height: 50px;
  width:100%;
  color: black;
  border: 0px solid;
  /* background-color:blueviolet; */
}
.post .post_header .close{
  position: relative;
  font-size:20px;
  width:20px;
  height:20px;
  color:dimgrey;
  background-color: transparent;
  border-color: transparent;
}
.post .post_header .edit{
  position: relative;
  box-sizing: border-box;
  font-size:20px;
  width:20px;
  height:20px;
  color:dimgrey;
  background-color: transparent;
  border-color: transparent;
}

.post .post_body{
  font-size: 16px;
  color:cadetblue;
  text-align: left;
  padding: 5px;
  border: 0px solid;
  /* background-color: orange; */
  width: 100%;
  min-height: 25px;
}
.post .post_body .creator{
  text-align: right;
  left:0;
  right: 0;
  top: 0;
  bottom: 0;
  margin-right: 10px;
  margin-bottom: 5px;
  /* right: 10px; */
}
.post .post_body textarea{
  width: 95%;
  min-height:24px;
  border: 0px;
  font-size: 16px;
  color:cadetblue;
}
</style>
7. components/AddPost.vue
포스트 추가하는 부분을 모양만 만들어놓습니다.
<template>
  <div class="new_post">
    <div class="new_post_header">
      <input type="text" name="title" v-model="title" class="title"/>
      <input type="submit" value="Add" class="submit">
    </div>
    <div class="new_post_body">
      <textarea class="contents" name="body" v-model="body" />
    </div>
  </div>
</template>

<script>
export default {
data(){
  return {
    title:'제목',
    body:'내용',
  };
}
}
</script>

<style>

.new_post{
background-color:#E0EDFB;
/* margin: 5px auto; */
border: 1px solid grey;
border-radius: 10px;
box-sizing: content-box;
width:100%;
}
.new_post .new_post_header{
display: flex;
padding: 5px;
}
.new_post .new_post_header .title{
display:inline-block;
text-align: left;
font-size: 24px;
height: 50px;
width:100%;
color: black;
border: 0px solid black;
background-color:transparent;
}
.new_post .new_post_header .submit{
position: relative;
font-size:20px;
color:dimgrey;
background-color: transparent;
border-color: transparent;
}

.new_post .new_post_body{
position: relative;
font-size: 16px;
color:cadetblue;
text-align: left;

/* padding: 5px; */
}

.new_post .new_post_body .contents{
position: relative;
border: 0px;
left:0;
right:0;
margin: 5px;
width:99%;
box-sizing: border-box;
background-color:transparent;
}
</style>
<결과>
반응형
'Programming > Vue' 카테고리의 다른 글
| Vue todolist 만들기 - 5. Post 수정기능 (0) | 2023.05.04 |
|---|---|
| Vue todolist 만들기 - 4. Store 적용하기...Post추가/삭제 (0) | 2023.05.04 |
| Vue todolist 만들기 - 2. Vue 프로젝트 만들기 (0) | 2023.05.04 |
| Vue todolist 만들기 - 1. 환경세팅 (0) | 2023.05.04 |
| Electron-vue 보일러플레이트 만들기 (0) | 2022.06.22 |

