

서버리스 앱 만들기의 마지막 단원으로 Vue.js 프론트 앱을 배포해보도록 하겠습니다.
1. 앱 만들기
Vue 앱을 만들어줍니다.
vue create node_post_vue .    // .을 찍으면 현재 폴더에 프로젝트를 생성합니다.

vue add router  // 곧바로 router 라이브러리를 함께 설치해줍니다.
필요한 라이브러리를 아래와 같이 설치해줍니다.
npm i vuex axios간단히 백엔드에서 보내오는 데이터를 읽어다 표현해주는 것만 할건데도 Store를 구성하고 각 컴포넌트에서 Store state를 이용해야하는게 좀 불편해 보이네요. 그래도 한번만 세팅해놓으면 다음부터는 비교적? 편하게 작업을 할 수 있다고 생각하고 진행하셔요^^;;
(1) ./src/main.js
import { createApp } from 'vue'
import App from './App.vue'
import router from './router'
import {store} from './store/store.js'

createApp(App)
.use(router)
.use(store)
.mount('#app')
(2) ./src/App.vue
<template>
  <router-view/>
</template>

<style>
#app {
  font-family: Avenir, Helvetica, Arial, sans-serif;
  -webkit-font-smoothing: antialiased;
  -moz-osx-font-smoothing: grayscale;
  text-align: center;
  color: #2c3e50;
}
</style>
(3) ./src/router/index.js
import { createRouter, createWebHistory } from 'vue-router'
import HomeView from '../views/HomeView.vue'

const routes = [
  {
    path: '/',
    name: 'home',
    component: HomeView
  }
]

const router = createRouter({
  history: createWebHistory(process.env.BASE_URL),
  routes
})

export default router
(4) ./src/components/HelloWorld.vue
<template>
  <div class="hello">
    <ul>
      <li class="post" v-for="post in postlist" :key=post>
        <div class="title">
          {{ post.title }}
        </div>
        <div class="content">
          {{ post.content }}
        </div>
        <div class="lower">
          <div>...by {{ post.creator }} </div>
          <div>on {{ post.publish_date.split('T')[0] }}</div>
        </div>
      </li>
    </ul>
  </div>
</template>

<script scoped>
export default {
  name: 'HelloWorld',
  props: {
    msg: String
  },
  computed:{
    postlist(){
      return this.$store.state.posts;
    },
  },
  created(){
      this.$store.dispatch('onLoad');
    }
}
</script>

<!-- Add "scoped" attribute to limit CSS to this component only -->
<style scoped>
ul {
  text-align: center;
  list-style-type: none;
  margin: 0 auto;
  padding: 0;
  width: 800px;
}
.post {
  /* display: inline-block; */
  margin: 10px 10px;
  border: 1px solid #42b983;
  border-radius: 15px;
  padding: 8px;
}

.post .title{
  text-align: left;
  font-family: 'Franklin Gothic Medium', 'Arial Narrow', Arial, sans-serif;
  font-size:larger;
  font-weight: 900;
  color:#222;
}
.post .content{
  text-align: left;
  font-size:small;
  padding: 5px;
  height: 80px;
  color:#999;
}
.post .lower{
  text-align: right;
  color:grey;
  font-size:small
}
a {
  color: #42b983;
}
</style>
(5) ./src/store/store.js
import { createStore } from 'vuex';
import axios from 'axios';

axios.defaults.baseURL = 'https://vmsahpyntz.eu10.qoddiapp.com';
axios.defaults.headers.post['Content-Type']='application/json;charset=utf-8';
axios.defaults.headers.post['Access-Control-Allow-Origin']='*';

export const store = createStore({
  state:{
    posts:[]
  },
  mutations:{
    updateState(state, payload){
      Object.keys(payload).forEach((key) => {
        state[key] = payload[key];
      });
    }
  },
  actions:{
    async onLoad(context){
      const res= await axios.get('/');
      const post = res.data;
      // console.log(res);

      context.commit('updateState',{
        posts:[...context.state.posts, ...post],
      })
    },
  }
});
2. gitlab에 배포하기
저는 회사 특성상 github 접근이 불가능해서 gitlab을 주로 사용합니다. 사용 방법은 github과 동일합니다.
git remote add origin [gitlab주소: 대활호 빼고]
git pull origin main
git add .
git commit -m "initial commit"
git push origin main // main인지 master인지 본인의 branch를 잘 확인하고 진행합니다.
3. Netlify에서 연동하기
Netlify에 접속해줍니다. 계정이 없다면 적당한 방법으로 계정을 생성해주셔요.
"Sites > Add new site > Import an existing project"를 클릭해줍니다.

아래 그림에서 본인의 저장소가 있는 곳을 선택합니다. 저는 Gitlab

본인의 프로젝트를 선택합니다.

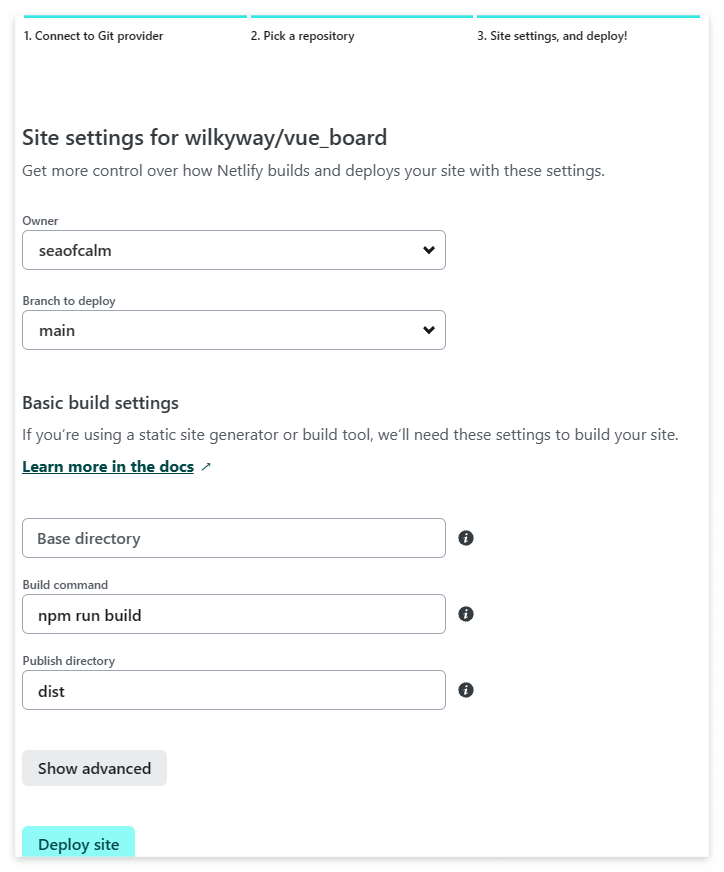
배포 세팅을 하게 되됩니다. 배포할 브랜치, 빌드 명령어(npm run build), 배포 디렉토리(일반적으로 /dist) 를 확인하고, 아래에 Deploy Site를 눌러주면 배포가 시작됩니다.
배포가 완료되면 아래와 같이 화면이 변경되며, 배포된 url이 표시가 됩니다.
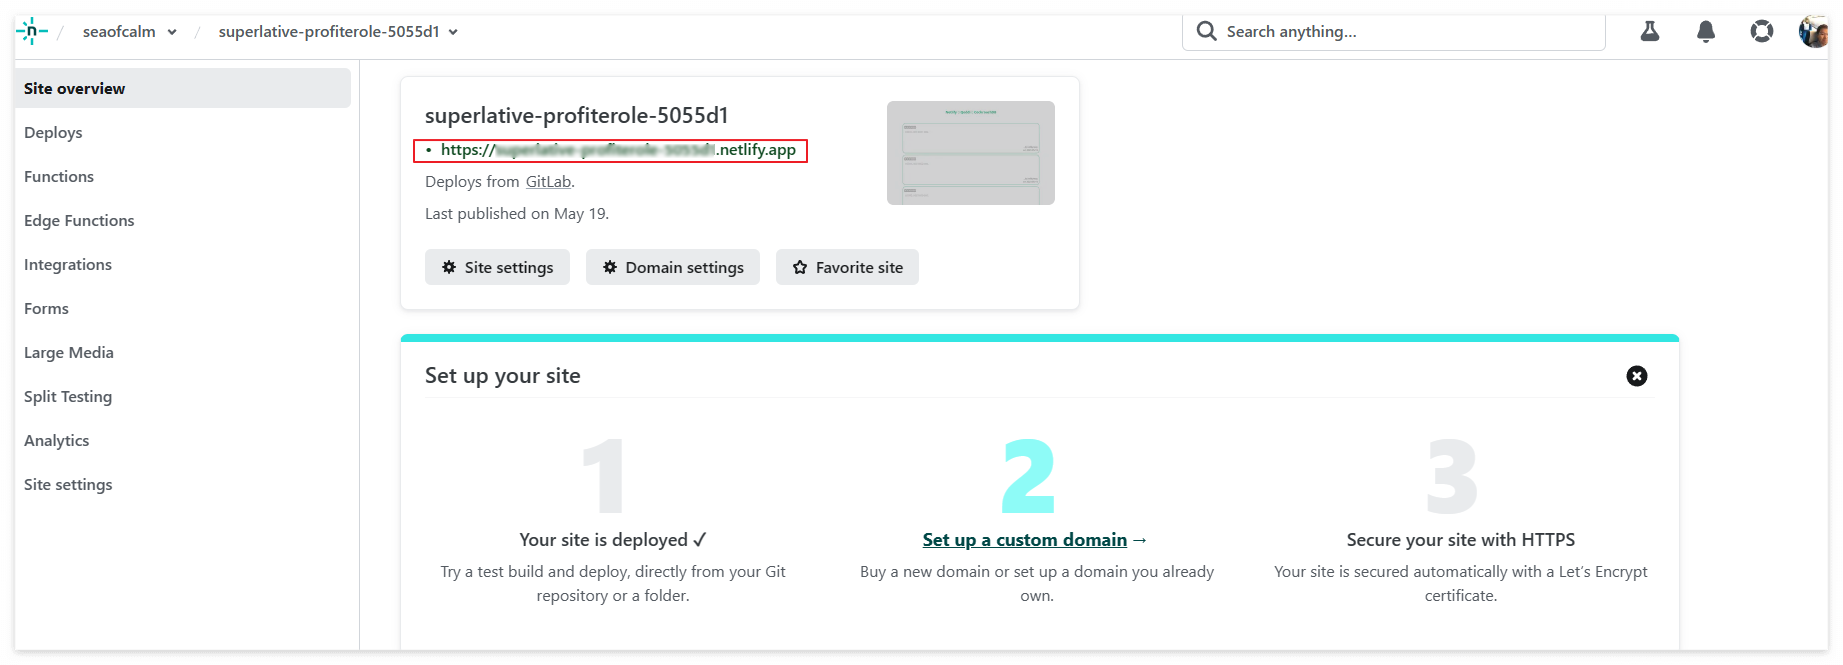
해당 링크를 클릭하면 우리가 만든 사이트가 나타납니다.

이제 수정사항이 생길때마다 Gitlab으로 배포만 하면 자동으로 Netlify도 업데이트됩니다.
지금까지 DB, Backend 서버, Frontend 서버를 모두 서버리스로 구현해보았습니다.

~~~끝~~~~
'Programming > Vue' 카테고리의 다른 글
| Vuepress2에서 vue 컴포넌트 만들어서 등록/사용하기 (0) | 2023.07.06 |
|---|---|
| Vuepress2 정적 사이트 생성기 시작하기 (0) | 2023.07.04 |
| 서버리스 앱만들기 - 2.Node 서버(Qoddi)에서 PostgresqlDB(CockroachDB) 데이터 읽어오기 (0) | 2023.05.20 |
| 서버리스 앱만들기 - 1. CockroachDB Serverless 데이터베이스 시작하기 (0) | 2023.05.18 |
| Vue todolist 만들기 - 8. Backend 연동을 위해 Frontend 수정하기 (0) | 2023.05.05 |