반응형


wpf처럼 테마 적용법을 찾아내고 싶었으나 잘 안된다. 대신 material skin을 적용하면 쉽게 화면 스타일을 바꿀 수 있다.


1. NugetPackageManager GUI 설치

2. MaterialSkin 설치
 - VSCode에서 Ctrl+Shift+P ->Nuget Package Manager GUI에서 materialskin 검색


3. Form1.cs 파일에 적용

namespace winform_ex02;
using System;
using System.Text;
using System.Xml;
using MaterialSkin; 	//추가
using MaterialSkin.Controls;	//추가


// public partial class Form1 : Form
public partial class Form1 : MaterialForm
{
    public Form1()
    {
        InitializeComponent();
        // 아래 추가
        var materialSkinManager = MaterialSkinManager.Instance;
        materialSkinManager.AddFormToManage(this);
        materialSkinManager.Theme = MaterialSkinManager.Themes.DARK;
        materialSkinManager.ColorScheme=new ColorScheme(Primary.BlueGrey900, Primary.BlueGrey900, Primary.BlueGrey500, Accent.LightBlue200, TextShade.WHITE);
		// 여기까지		
        
        // 이하는 버튼 클릭 이벤트...
        this.button1.Click += new System.EventHandler(this.button1_Click);
    }

    private void button1_Click(object sender, EventArgs e)
	{
		OpenFileDialog openFileDlg = new OpenFileDialog();        
		openFileDlg.Filter = "XML Files (*.xml)|*.xml";
		openFileDlg.ShowDialog();
		// MessageBox.Show("Hello World!");
		if (openFileDlg.FileName.Length > 0)
		{
			foreach (string Filename in openFileDlg.FileNames)
			{
				this.textBox1.Text = Filename;                
				
				XmlDocument xmlDoc = new XmlDocument();  // XmlDocument 객체 생성
				xmlDoc.Load(Filename);                 // XML 파일 로드                               
				XmlNodeList allNodes = xmlDoc.SelectNodes("//bookstore//*");
				StringBuilder sb = new StringBuilder();
				
				foreach(XmlNode node in allNodes){
					if(node.NodeType == XmlNodeType.Element){
						sb.Append(node.InnerText);
					}
					else if (node.NodeType == XmlNodeType.Text){
						sb.Append(node.Value );
					}
					// sb.Append("\n");
					sb.Append(Environment.NewLine);
				}

				this.result1.Text = sb.ToString();
			}
		}
	}
}


ColorScheme클래스의 생성 인자

materialSkinManager.ColorScheme=new ColorScheme(Primary.BlueGrey900, Primary.BlueGrey900, Primary.BlueGrey500, Accent.LightBlue200, TextShade.WHITE);
        // 인자1 `Primary.BlueGrey900`: 테마의 기본 색상. 메인 강조 색상. 진한 청회색.
        // 인자2 `Primary.BlueGrey900`: 보조 색상으로 호버 색상. 초점 색상.
        // 인자3 `Primary.BlueGrey500`: 3차 색상. 배경색 or 은은한 그림자 색상으로 가끔 사용됨. 
        // 인자4 `Accent.LightBlue200`: 버튼, 링크 등 강조 색상. 연한 파란색
        // 인자5 `TextShade.WHITE`: 텍스트 음영


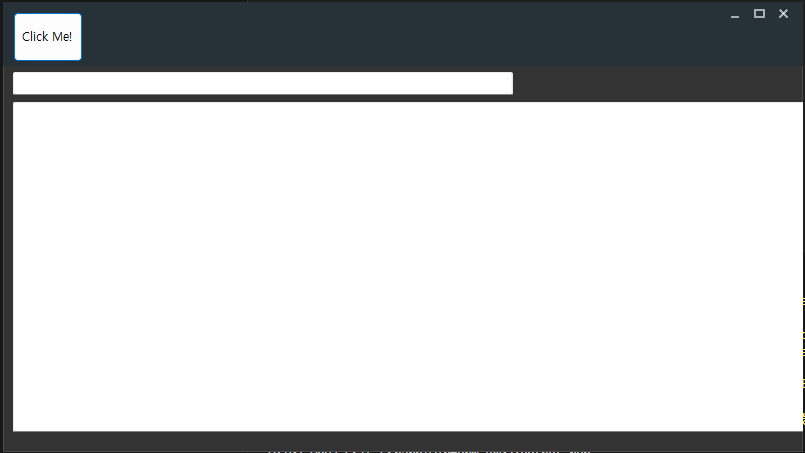
4. Form1.Designer.cs (버튼 클릭 이벤트/폼 예제)

namespace winform_ex02;

partial class Form1
{
    /// <summary>
    ///  Required designer variable.
    /// </summary>
    private System.ComponentModel.IContainer components = null;

    /// <summary>
    ///  Clean up any resources being used.
    /// </summary>
    /// <param name="disposing">true if managed resources should be disposed; otherwise, false.</param>
    protected override void Dispose(bool disposing)
    {
        if (disposing && (components != null))
        {
            components.Dispose();
        }
        base.Dispose(disposing);
    }

    #region Windows Form Designer generated code

    /// <summary>
    ///  Required method for Designer support - do not modify
    ///  the contents of this method with the code editor.
    /// </summary>
    private Button button1;
    private TextBox textBox1;
    private TextBox result1;
    private Panel panel1;
    private void InitializeComponent()
    {
        this.components = new System.ComponentModel.Container();
        this.AutoScaleMode = System.Windows.Forms.AutoScaleMode.Font;
        this.ClientSize = new System.Drawing.Size(800, 450);
        this.Text = "Form1";

        // 버튼 컨트롤 생성 및 설정
        this.button1 = new System.Windows.Forms.Button();
        this.button1.Location = new System.Drawing.Point(10, 10);
        this.button1.Name = "button1";
        this.button1.Size = new System.Drawing.Size(70, 50);
        this.button1.Text = "Click Me!";
        this.button1.UseVisualStyleBackColor = true;
        // this.button1.Click += new System.EventHandler(this.button1_Click);  // 클릭 이벤트 핸들러 등록

        // 버튼을 폼에 추가
        this.Controls.Add(this.button1);

        // 텍스트 박스 생성 및 추가
        this.textBox1 = new System.Windows.Forms.TextBox();
        this.textBox1.Location = new System.Drawing.Point(10, 70);
        this.textBox1.Name = "textBox1";
        this.textBox1.Size = new System.Drawing.Size(500, 500);
        this.textBox1.Text = "";
        // this.textBox1.UseVisualStyleBackColor = true;
        this.Controls.Add(this.textBox1);

        // 패널 생성 및 추가  
        this.panel1 = new System.Windows.Forms.Panel();   
        this.panel1.Anchor = ((System.Windows.Forms.AnchorStyles)(((System.Windows.Forms.AnchorStyles.Top | System.Windows.Forms.AnchorStyles.Left) 
            | System.Windows.Forms.AnchorStyles.Right | System.Windows.Forms.AnchorStyles.Bottom)));
        this.panel1.Location = new System.Drawing.Point(10, 100);   
        this.panel1.Name = "panel1";        
        this.panel1.Size = new System.Drawing.Size(1090,330);
        // this.panel1.TabIndex = 0;
        // this.panel1.Width = this.ClientSize.Width;
        // this.panel1.Height = this.ClientSize.Width;
        // this.panel1.Dock = System.Windows.Forms.DockStyle.Fill;
        this.panel1.AutoScroll = true;
        this.panel1.BackColor = Color.DimGray;
        
        this.Controls.Add(this.panel1);

        // 텍스트 박스 생성 및 추가
        this.result1 = new System.Windows.Forms.TextBox();
        this.result1.Name = "resul1";
        this.result1.Multiline = true;    
        this.result1.Location = new System.Drawing.Point(0, 0);     
        this.result1.ScrollBars = System.Windows.Forms.ScrollBars.Vertical;
        this.result1.Dock = System.Windows.Forms.DockStyle.Fill; // Dock 속성 설정
        this.result1.Text = "";

        // 텍스트 박스의 크기와 위치를 조정               
        // this.result1.Width = this.panel1.ClientRectangle.Width;
        // this.result1.Height = this.panel1.ClientRectangle.Height;        
        this.panel1.Controls.Add(this.result1);
    }

    #endregion
}
 

반응형
반응형

부트스트랩의 dropdown menu로 nav bar를 구성할 때, 클릭할 경우에 하위 메뉴가 나타난다. 이를 hover시 나타나게 하려면 자신의 CSS파일에 아래 구문 추가하면 됨.

.navbar-nav li:hover .dropdown-menu {
    display: block;
}


Dropdown Menu 예시는 부트스트랩 페이지에서...

<div class="dropdown">
  <button class="btn btn-secondary dropdown-toggle" type="button" id="dropdownMenuButton1" data-bs-toggle="dropdown" aria-expanded="false">
    Dropdown button
  </button>
  <ul class="dropdown-menu" aria-labelledby="dropdownMenuButton1">
    <li><a class="dropdown-item" href="#">Action</a></li>
    <li><a class="dropdown-item" href="#">Another action</a></li>
    <li><a class="dropdown-item" href="#">Something else here</a></li>
  </ul>
</div>

반응형
반응형


1. 실행

버그 아이콘을 클릭하여 디버그 모드를 실행한다.


스프링의 경으 스프링 Dashboard에서 디버그모드 실행 아이콘을 클릭한다.


2. 디버깅

Step Into(F5): 한 줄씩 진행. 함수를 만나면 함수 내부로 진입.

Step Over(F6): 한 줄씩 진행. 함수 호출은 건너뜀.

Step Return(F7): 현재 함수 끝까지 바로 가서 리턴 후 함수 호출부로 되돌아감.

Resume(F8): 다음 브레이크 포인트까지 진행.


3. 디버그 활용

 - Breakpoints : 현재 설정되어있는 Breakpoint 모두 확인


- Variables : 모든 변수 확인


- Expressions : 특정 변수 확인

반응형
반응형

재귀적으로 처리하는 여러 예제가 있는데, AI한테 물어보니 간단한 방법을 알려줬다.


import org.apache.commons.io.FileUtils;

public class CopyDirectoryCommonsIO {
    public static void main(String[] args) throws IOException {
        Path source = Paths.get("C:/source/folder");
        Path target = Paths.get("C:/target/folder");

        FileUtils.copyDirectory(source.toFile(), target.toFile());
        System.out.println("폴더 복사 완료");
    }
}


반응형
반응형


특정 API에서 파일 다운로드를 제공할 때, 이를 받아들이는 Javascript 예제.

파일명은 API의 Header에 'Content-Disposition' 값에서 가져온다.


fetch('/api/download')
  .then(response => {
    if (!response.ok) {
      throw new Error('Network response was not ok');
    }

    // Content-Disposition 헤더에서 파일명 추출
    const contentDisposition = response.headers.get('Content-Disposition');
    const filenameRegex = /filename="?([^"]+)"?/i;
    const matches = filenameRegex.exec(contentDisposition);
    const filename = matches && matches[1];

    return response.blob();
  })
  .then(blob => {
    const url = window.URL.createObjectURL(blob);
    const link = document.createElement('a');
    link.href = url;
    link.setAttribute('   
download', filename || 'download.bin'); // 파일명이 없을 경우 기본값 설정
    document.body.appendChild(link);
    link.click();
    window.URL.revokeObjectURL(url);
  })
  .catch(error => {
    console.error('Error:', error);
  });
반응형
반응형

Gitlab에서 pull 하려고 하는데 갑자기 오류가 떴다.


이를 해결하기 위해 CA 인증 절차를 무시한다.

git config --global http.sslVerify false


반응형
반응형


@PreAuthorize()는 메서드를 실행하기 전에 하는 권한 검사

@PostAuthorize()는 메서드를 실행하고 클라이언트에게 응답을 하기 직전에 하는 권한 검사


<예시>

@PreAuthorize("isAuthenticated()")


인자로 올 수 있는 값...

  • hasRole([role]) : 현재 사용자의 권한이 파라미터의 권한과 동일한 경우 true
@PreAuthorize("hasRole('ADMIN') or hasRole('MANAGER')")


  • hasAnyRole([role1,role2]) : 현재 사용자의 권한이 파라미터의 권한 중 일치하는 것이 있는 경우 true
@PreAuthorize("hasAnyRole('ADMIN', 'MANAGER')")


  • principal : 사용자를 증명하는 주요객체(User)를 직접 접근할 수 있다.
  • authentication : SecurityContext에 있는 authentication 객체에 접근 할 수 있다.
@PreAuthorize("#userId == authentication.principal.id")
or
@PreAuthorize("#username == authentication.name")


  • permitAll() : 모든 접근 허용
  • denyAll() : 모든 접근 비허용
  • isAnonymous() : 현재 사용자가 익명(비로그인)인 상태인 경우 true
  • isRememberMe() : 현재 사용자가 RememberMe 사용자라면 true
  • isAuthenticated() : 현재 사용자가 익명이 아니라면 (로그인 상태라면) true
  • isFullyAuthenticated() : 현재 사용자가 익명이거나 RememberMe 사용자가 아니라면 true
@PreAuthorize("isAuthenticated()")
@PreAuthorize("isAnonymous()")


반응형
반응형

평생 공짜로 쓸 수 있다고 해서 Oracle Freetier에 장비 하나를 구성해두었습니다. 

한참 잊고 지내고 있었는데, 그때 돌려놓았던 node 서버가 여전히 잘 돌아가고 있더군요.


이번엔 Oracle Freetier서버에 ExpressJS로 백엔드 서비스를 구성하고,

Netlify에 Jquery로 통신이 가능한 웹프로그램을 구성해 보았습니다.


1. Oracle Freetier

Cloud Free Tier | Oracle 대한민국


클라우드 서비스 무료 이용

Oracle Cloud Free Tier는 기업에게 무제한으로 사용할 수 있는 상시 무료 클라우드 서비스를 제공합니다.

www.oracle.com


[src/index.js]

간단하게 'Hello World'만 return하는 서버를 만들어 두었습니다. Github에서 해당 서버로 자동배포하는 것까지 구성은 못해서 FTP로 일일이 옮겨넣었습니다.

var express = require('express');
var app = express();
var user = require('./routes/user');

const cors = require('cors');
app.use(cors());

app.get('/', function (req, res) {	// 기본 root('/') 는 main.js에서 routing
    res.send('Hello World');
});

//app.use('/user', user);         	// 나머지 접근은 router(/routes/user)에서 routing


app.listen(3000, function () {   	// 3000 포트로 서버 실행
    console.log('Example App is listening on port 3000');
});

소스코드에 보시면, 다른 서버로부터의 요청이 허용되도록 app.use(cors())를 선언해줘야합니다.

위치는 라우팅보다 앞에 선언되어야 합니다.


2. Netlify

Scale & Ship Faster with a Composable Web Architecture | Netlify


Scale & Ship Faster with a Composable Web Architecture | Netlify

Realize the speed, agility and performance of a scalable, composable web architecture with Netlify. Explore the composable web platform now!

www.netlify.com


Netlify는 Github이나 Gitlab과 연동이 잘 되어 별도의 구성 없이도 CI/CD가 쉽게 가능합니다. 그래서 다른 Front Framework 사용하지 않고 html하고 jquery만으로 데이터를 받아오는 연습을 해봤습니다.


[index.html]

<!DOCTYPE html>
<html lang="en">
<head>
  <meta charset="UTF-8">
  <meta name="viewport" content="width=device-width, initial-scale=1.0">
  <title>Document</title>
  <script src="./js/jquery.min.js"></script>
</head>
<body>
 <div id="headline">Hello!!</div>
 <button onclick="ajax_request()">Ajax Request</button>
<script>
  function ajax_request(){
      $.ajax({
        url:'/api/', //'http://1xx.6xx.2xx.2xx:3000/', <- netlify에서 https요청으로 보내면, netlify.toml의 proxy설정을 통해 해당 서버로 요청됨
        method:'GET',
        async:false,
        success: function(data){
          console.log(data);
          document.getElementById('headline').innerText =data;
        }
      })
  }
 
</script>  
</body>
</html>


[netlify.toml]

[[redirects]]
  from = "/api/*"
  to = "http://1xx.6xx.2xx.2xx:3000/:splat"
  status = 200
  force = true


oracle 서버에서 cors 허용을 해놓았는데도 원래의 주소로 request를 보내면 오류가 납니다. 이유는 oracle에서는 http로 서비스를 하고 있고, netlify에서는 https로 서비스를 하고 있어서 그렇습니다. oracle에도 https서비스를 위한 인증서를 구해서 넣으면 좋지만, 위와 같이 proxy 우회 방법으로 간단히 두 서버간 통신이 가능합니다.


netlify에서는 ajax요청할 때, '/api/' 로 요청을 보내고,

netlify proxy설정을 통해 원래 서버로 전달됩니다.


그럼 이만~!

반응형

'Programming > ExpressJS' 카테고리의 다른 글

Node강좌 - 미들웨어  (0) 2020.08.09
Node강좌 - express 설치 / router설정  (0) 2020.08.09

+ Recent posts